以下是我使用 GitHub Copilot 构建我的第一个浏览器扩展程序的七个步骤,以及我在人工智能时代学习和结对编程的三个主要心得。
我曾用 GitHub Copilot 开发过石头剪刀布游戏,但从未开发过浏览器扩展。作为 GitHub 的开发者布道师,我决定测试一下 GitHub Copilot,包括它即将推出的聊天功能,看看它能否帮助我编写一个用于清除 Google Chrome 缓存的扩展程序。
说实话,这并没有我想象的那么简单。整个组装过程中我有很多疑问,也需要学习很多新知识。
但最终,我通过使用生成式 AI 编码工具学习了一项全新的技能,并通过 GitHub Copilot 和 Twitch 上的其他开发者进行结对编程,积累了宝贵的经验。
我希望创建一些步骤,让任何人——即使是没有开发经验的人——在构建这个扩展程序或任何其他扩展程序时都能轻松复现。此外,我还想分享我与 GitHub Copilot 和人类开发者一起进行结对编程一夜后的新心得。
下面您将看到两个部分:
- 如何使用 GitHub Copilot 七步构建 Chrome 扩展程序。
- 您将看到我的问题和提示,以及来自 GitHub Copilot 的回复。
- 我在人工智能时代学习和结对编程方面学到的三个重要经验。
让我们开始吧。

如何使用 GitHub Copilot 构建 Chrome 扩展程序
首先,您需要在 IDE 中安装并打开 GitHub Copilot 。我目前还能使用GitHub Copilot 聊天功能的早期预览版,遇到问题时我就是用它解决的。如果您还没有 GitHub Copilot 聊天功能,可以先加入候补名单,并暂时将GitHub Copilot与 ChatGPT 搭配使用。
1.我通过聊天窗口向 GitHub Copilot 提问:“如何创建 Chrome 扩展程序?文件结构应该是什么样的?”
GitHub Copilot 为我提供了创建扩展程序的一般步骤——从设计文件夹结构到在 Chrome 中本地运行项目。
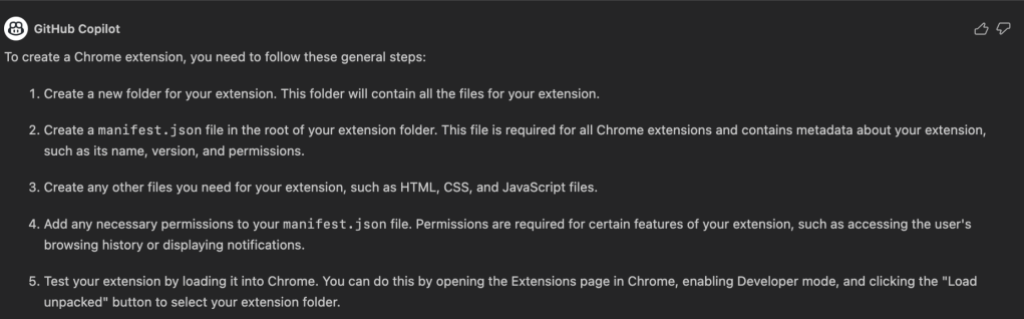
然后,它分享了一个 Chrome 扩展程序文件结构的示例。
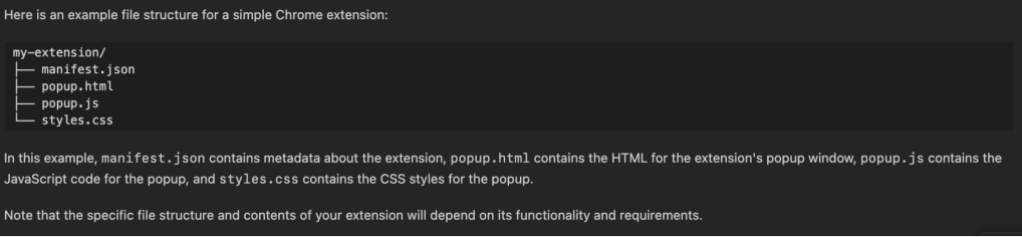
为了节省您的时间,以下图表简要定义了这些文件的用途:
| manifest.json | 关于您的扩展程序的元数据,例如名称、版本和权限。Manifest 作为专有名词是 Google Chrome API 的名称。最新版本为 V3。 |
| popup.js | 当用户点击 Chrome 工具栏中的扩展程序图标时,会弹出一个窗口。此文件决定了该弹出窗口的行为,并包含处理用户与弹出窗口交互的代码。 |
| popup.html 和 style.css | 这些文件构成了弹出窗口的视觉效果。popup.html 是界面,包括布局、结构和内容。style.css 决定了 HTML 文件在浏览器中的显示方式,包括字体、文本颜色、背景等等。 |
2. 创建 manifest.json 文件
我在IDE的一个文件夹中创建了一个名为manifest.json的文件。在manifest.json文件中,
我描述了我想要的文件:
Manifest for Chrome extension that clears browser cache.
manifest_version: 3
Permissions for the extension are: storage, tabs, browsingData
我按下回车键,然后输入一个花括号,调用 GitHub Copilot 的建议。
在花括号内,GitHub Copilot 建议了清单文件。我删除了描述我想要的 manifest.json 文件的行,最终的文件如下所示:
{
   "name": "Clear Cache",
   "version": "1.0",
   "manifest_version": 3,
   "description": "Clears browser cache",
   "permissions": [
       "storage",
       "tabs",
       "browsingData"
   ],
   "action": {
       "default_popup": "popup.html"
   },
   "background": {
       "service_worker": "background.js"
   }
}
3. 创建一个 Service Worker,它是一个名为 background.js 的文件。
这并非我与 GitHub Copilot 聊天时被推荐的文件。我是从一位观看我直播的开发者那里得知它必不可少的。background.js 文件使你的扩展程序能够在后台运行,执行任务,并响应扩展程序弹出窗口之外的用户事件(例如网络请求和数据存储)。
我在 background.js 文件中写了一条注释,描述了我想要的 Service Worker:
Service Worker for Google Chrome Extension
Handles when extension is installed
Handles when message is received
然后,我为第一个函数写了一条评论,这促使 GitHub Copilot 提出了建议,然后我又写了一条评论来描述第二个函数。
最终文件如下所示:
/*
Service Worker for Google Chrome Extension
Handles when extension is installed
Handles when message is received
*/
// console.log when extension is installed
chrome.runtime.onInstalled.addListener(function() {
   console.log("Extension installed");
});

// send response when message is received and console.log when message is received
chrome.runtime.onMessage.addListener(function(request, sender, sendResponse) {
   console.log("Message received");
   sendResponse("Message received");
});
4. 创建 popup.html 文件
我在 popup.html 文件中添加了一条注释,描述了我希望弹出窗口的显示方式。用户点击扩展程序图标时就会看到这个窗口。
GitHub Copilot 建议如下:
       <title>Clear Cache</title>


       <h1>Clear Cache</h1>
       <button id="allHistory">All History</button>
       <button id="pastMonth">Past Month</button>
       <button id="pastWeek">Past Week</button>
       <button id="pastDay">Past Day</button>
       <button id="pastHour">Past Hour</button>
       <button id="pastMinute">Past Minute</button>
       <p id="lastCleared"></p>
       <a href="http://popup.js">http://popup.js</a>
5. 测试浏览器扩展程序
我决定在添加其他样式或交互功能之前先测试一下修改效果。我更喜欢逐步修改,并在修改过程中进行手动测试,因为这样可以简化调试过程。
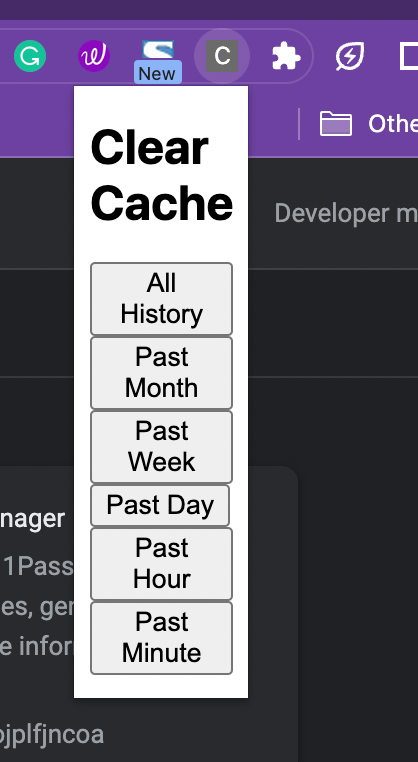
在 Chrome 浏览器中访问 chrome://extensions/。启用开发者模式。点击“加载已解压的扩展程序”。上传包含 Chrome 扩展程序的文件夹。加载完成后,您应该可以测试扩展程序了。以下是我的扩展程序示例:
6. 创建一个 popup.js 文件以添加交互功能
在这个文件中,写一条注释,这条注释将作为伪代码供你参考,同时也会作为 GitHub Copilot 的提示。
伪代码并非代码,而是一种在编写实际代码之前,用于概念化和交流想法以规划和设计程序的方法。程序员可以专注于算法逻辑,而无需担心特定编程语言的语法细节,并且可以与其他开发人员交流想法,而无需考虑他们的编码经验。
以下是我使用的伪代码:
/*
This program is a Chrome Extension that clears browser cache.
Handle on button click:
- button with id "allHistory" that clears all cache history
- button with id "pastMonth" that clears cache history from the past month
- button with id "pastWeek" that clears cache history from the past week
- button with id "pastDay" that clears cache history from the past day
- button with id "pastHour" that clears cache history from the past hour
- button with id "pastMinute" that clears cache history from the past minute


Create function that
- converts dates and times into human-readable format
- adds "Successfully cleared cache" with date and time in a paragraph with id "lastCleared"
*/
然后,按顺序逐条输入以下注释,以便 GitHub Copilot 能够在每条注释后生成代码建议。最终的 popup.js 文件如下所示:
/*
This program is a Chrome Extension that clears browser cache.
Handle on button click:
- button with id "allHistory" that clears all cache history
- button with id "pastMonth" that clears cache history from the past month
- button with id "pastWeek" that clears cache history from the past week
- button with id "pastDay" that clears cache history from the past day
- button with id "pastHour" that clears cache history from the past hour
- button with id "pastMinute" that clears cache history from the past minute

Create function that
- converts dates and times into human-readable format
- adds "Successfully cleared cache" with date and time in a paragraph with id "lastCleared"
*/
// convert date and time into human-readable format
function convertDate(date) {
   let date = new Date(date);
   var options = { weekday: 'long', year: 'numeric', month: 'long', day: 'numeric' };
   return date.toLocaleDateString("en-US", options);
}

// add successfully cleared cache into paragraph with id "lastCleared"
function addCleared() {
   var p = document.getElementById("lastCleared");
   let date = new Date();
   p.innerHTML = "Successfully cleared cache " + convertDate(date);
}

// clear all cache history
document.getElementById("allHistory").addEventListener("click", function() {
   chrome.browsingData.removeCache({ "since": 0 }, function() {
       addCleared();
   });
});

// clear cache history from the past month
document.getElementById("pastMonth").addEventListener("click", function() {
   let date = new Date();
   date.setMonth(date.getMonth() - 1);
   chrome.browsingData.removeCache({ "since": date.getTime() }, function() {
       addCleared();
   });
});

// clear cache history from the past week
document.getElementById("pastWeek").addEventListener("click", function() {
   let date = new Date();
   date.setDate(date.getDate() - 7);
   chrome.browsingData.removeCache({ "since": date.getTime() }, function() {
       addCleared();
   });
});

// clear cache history from the past day
document.getElementById("pastDay").addEventListener("click", function() {
   let date = new Date();
   date.setDate(date.getDate() - 1);
   chrome.browsingData.removeCache({ "since": date.getTime() }, function() {
       addCleared();
   });
});

// clear cache history from the past hour
document.getElementById("pastHour").addEventListener("click", function() {
  let date = new Date();
   date.setHours(date.getHours() - 1);
   chrome.browsingData.removeCache({ "since": date.getTime() }, function() {
       addCleared();
   });
});

// clear cache history from the past minute
document.getElementById("pastMinute").addEventListener("click", function() {
  let date = new Date();
   date.setMinutes(date.getMinutes() - 1);
   chrome.browsingData.removeCache({ "since": date.getTime() }, function() {
       addCleared();
   });
});
GitHub Copilot 实际上生成了 var 关键字,但它已经过时了。所以我把这个关键字改成了let.
7. 在文件夹中创建最后一个文件:style.css
请写一条注释,描述您希望扩展程序呈现的样式。然后,输入“body”,并继续按 Tab 键,直到 GitHub Copilot 列出所有样式建议。
我最终的 style.css 文件内容如下:
/* Style the Chrome extension's popup to be wider and taller
Use accessible friendly colors and fonts
Make h1 elements legible
Highlight when buttons are hovered over
Highlight when buttons are clicked
Align buttons in a column and center them but space them out evenly
Make paragraph bold and legible
*/

body {
   background-color: #f1f1f1;
   font-family: Arial, Helvetica, sans-serif;
   font-size: 16px;
   color: #333;
   width: 400px;
   height: 400px;
}

h1 {
   font-size: 24px;
   color: #333;
   text-align: center;
}

button {
   background-color: #4CAF50;
   color: white;
   padding: 15px 32px;
   text-align: center;
   text-decoration: none;
   display: inline-block;
   font-size: 16px;
   margin: 4px 2px;
   cursor: pointer;
   border-radius: 8px;
}

button:hover {
   background-color: #45a049;
}

button:active {
   background-color: #3e8e41;
}

p {
   font-weight: bold;
   font-size: 18px;
   color: #333;
}
| 有关详细的分步说明,请查看我的Chrome 扩展程序和 GitHub Copilot 存储库。 |
人工智能时代学习和结对编程的三个重要经验
- 生成式人工智能可以降低犯错的恐惧。学习一门新语言或框架,或者启动一个新项目,都可能令人望而生畏。不知道从何入手,或者害怕犯错后需要花费数小时才能调试,这些恐惧都可能成为迈出第一步的一大障碍。我从事开发工作三年多了,但边直播边编码仍然让我感到紧张。我有时会过于关注观看我编码的人,而忽略了实际的逻辑。当我与 GitHub Copilot 交流时,我确信自己正朝着正确的方向前进,这帮助我在直播过程中保持动力和信心。
-
生成式人工智能让学习新知识变得更容易,但它并不能取代学习本身。GitHub Copilot 并没有神奇地为我编写一个完整的 Chrome 扩展程序。我必须尝试不同的提示,并在直播中向 GitHub Copilot、ChatGPT、Google 和开发者提问。简单来说,我在直播的同时完成了步骤 1 到 5,总共花了大约 1.5 小时。
但如果我没用 GitHub Copilot,就得从头开始写这些代码,或者零零散散地搜索。有了 AI 生成的代码建议,我可以直接进行代码审查和故障排除,从而把更多的时间和精力集中在理解代码的工作原理上。我仍然需要努力学习一项全新的技能,但我分析和评估代码的频率远高于学习和记忆代码的频率。
-
生成式人工智能编码工具让我与其他开发者的协作变得更加轻松。观看直播的开发者能够理解我的思路,因为我需要告诉 GitHub Copilot 我的需求。通过与人工智能结对程序员清晰地沟通我的意图,我也能够更清晰地与直播中的开发者交流。这使得观看直播的人能够轻松地成为我直播期间的虚拟结对程序员。
总的来说,使用 GitHub Copilot 让我的思路和工作流程更加清晰透明。就像我之前提到的,实际上是一位开发者在我的直播中建议我使用 Service Worker 文件,因为他注意到 GitHub Copilot 建议的文件结构中并没有包含它。在与 GitHub Copilot 的聊天以及通过 Google 搜索确认我需要 Service Worker 后,我便使用 GitHub Copilot 来帮助我编写了一个。
观看 GitHub CEO Thomas Dohmke 使用 GitHub Copilot 在不到 18 分钟内创建经典贪吃蛇游戏。

把这个带走
GitHub Copilot 让我更有信心学习新知识,也更乐于与其他开发者协作。正如我之前所说,实时编码可能会让人紧张。(即使只是和同事结对编程,我也会紧张!)但 GitHub Copilot 的实时代码建议和纠错功能就像一张安全网,让我能够在直播观众面前更加自信、快速地编写代码。此外,由于我需要与 AI 结对程序员清晰地沟通我的意图,我也能够与观看直播的开发者们进行清晰的交流。这使得与他们进行虚拟协作变得轻松便捷。
与 GitHub Copilot 和其他开发者的实时互动,帮助我发现了错误,学习了编码建议,并巩固了我自身的理解和知识。最终,我为浏览器扩展程序编写出了高质量的代码库。
这个项目充分证明了人机交互的强大协作能力。此次经验凸显了GitHub Copilot如何成为增强开发者信心、促进学习和加强协作的有力工具。